Sunday, March 17, 2013

Kit Kat cake


Kit Kat cakes can be found all over the internet. When I was looking for something easy to make, yet impressive, I decided the Kit Kat cake fitted the bill.


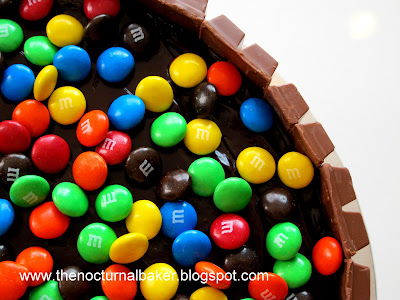
This was for my daughter Claire to bring to school for her birthday celebration. It was an 8" dark chocolate cake, covered with Belgian chocolate ganache! Then I stuck Kit Kats round the sides and topped it with plenty of M&Ms! A pretty purple polka-dot ribbon completed the look. It was a chocolate lover's dream come true!


I love the look of this cake! It makes kids and adults alike gasp in delight! And the taste? Chocolate nirvana....


Andy & Athena


A sweet cousin of mine got married last year and I was honoured to have been asked to create the wedding cake and do a dessert table for the reception. I so love an elegant dessert table!


So the for the wedding cake, she wanted something with a lot of bling. So I came up with a 5 tiered cake embellished with hundreds  of silver dragees. The fondant covering was given a shimmery pearl wash. The Precious Moments topper was a ceramic one bought by my cousin herself.

 
As for the dessert table, I tried to go with the red and white colour theme. We had marshmallow pops, Oreo pops, red velvet and Belgian chocolate cupcakes, orange chocolate cake pops as well as banana cheese cake pops and pinwheel mints.


A scattering of rose petals completed the romantic set up.

As you can see, I had plenty of assistants to help me throughout the night :)

Elmo for Lara

So far the most popular children's character for cake orders I've received is.... Elmo!


So here's another Elmo, this time for Little Lara, all the way in KL! He was made from rice krispies treats and gumpaste, and was carefully hand carried on the plane.


When Elmo got there, all Lara's mummy had to do was to plop it on top of a gorgeous cake made by another friend.

Here's a nice photo of the complete ensemble, taken by a professional photographer:


King Jordan


Gosh! I've neglected my blog for half a year!

Be prepared for a diarrhoea of backlogged posts!! Lol!!

 We shall start off with a cake my friend requested for her son who turned one! She wanted two figurines; one of her son as a king, and another of Baby Bugs Bunny, since he was born in the year of the rabbit. So this is the end product:


Wednesday, October 10, 2012

Boboi Boy


So there is this popular cartoon in Malaysia called "Boboi Boy". It is a cute superhero, but quite a complex one, so when a customer ordered it, I was intrigued by the challenge!

Obviously, the one component which I spent the most time on was the Boboi Boy figurine itself. Luckily I started a week earlier on him, because at the last minute, my client moved the date of the party forward by one day!

The decor on the cake itself was kept simple, as I did not have sufficient time to dwell on it for too long. The figurine turned out great! I wanted a more lively pose, instead of the usual standing straight or sitting pose. It was made of gumpaste and had a wire frame inside.


 There were some stress cracks showing by the time of pick-up, but nothing major. I think I will have to plan more carefully next time I use a wire frame for an asymmetrical figurine. There will be places where there is more sagging, so all these have to be taken into account when building up the figurine. Just to be sure the stress cracks did not get worse during transporting, I placed a ball of blue fondant (same colour as the cake covering so it would be less noticable) under the figurine for support.

The cake was an 8" chocolate cake covered in fondant. The Boboi Boy, the no. 3 and the stars are made of gumpaste. Initially I had other ideas for the border round the base of the cake, but since the order was put a day forward, an emergency ribbon did the trick!

The cake had to be driven to Santubong, where the party was held. That's a 45 mins drive away, and I was so relieved to find out that it had survived the journey! Hurray!

I'm very proud of this figurine. It is one of my favourites so far.


Tuesday, October 9, 2012

Rainbow sprinkles


My little niece Amelie loves drawing and colouring rainbows! So when her birthday rolled around, it only made sense to make her a rainbow cake!

I was inspired by the famous rainbow cake made by The Greedy Baker. Initially I wanted to make the inside a rainbow coloured cake as well, but didn't have the time. So in the end, the cake was a red velvet cake, filled and coated with cream cheese frosting.


It was then covered in sprinkles! This was not as easy as I thought it would be and my kitchen ended up generously sprinkled with hundreds and thousands!

The rainbow was made ahead of time using gumpaste and wires. Then on the day of the party, I just stuck in onto the top. The last bit was to pipe a border of cream cheese frosting round the base of the cake and the rainbow.

The kids loved it and I must say this is an easy yet effective way to cover a cake!


Monday, October 1, 2012

Vintage cupcakes


I love, love, love vintage cupcakes with those muted, classy colours. Check out Cotton and Crumbs' Flickr photos. I could drool over them whole day long!


Anyway, since I usually do children's cakes and cupcakes, I have never had much chance to dabble in the vintage style. So when a client wanted cupcakes  for an engagement and left the design up to me, vintage it was!


The cupcakes were a delicious selection of red velvet, Belgian chocolate and green tea cream cheese.

Okay, now if you'll excuse me, I want to go check out Cotton and Crumbs' Flickr account for more eye candy! ;)


Friday, September 28, 2012

Cheating with plastic


Here is a project which was so easy because the customer requested I use plastic figurines! I didn't mind at all, for if I had to make all these by hand, it would've  taken me forever!

The cake was a square chocolate cake covered and filled with buttercream. For the wooden beams, I used Cadbury chocolate fingers. The angry Birds are plastic and the name "Ryan" is cut from fondant. I used a shell tip to pipe the buttercream border. As usual, my piping skills leave much to be desired.


My client also wanted some cupcakes to go with the cake. For these, she wanted Smurf plastic figurines. These are simple vanilla cupcakes with a really delicious caramel buttercream!

I am not too fond of buttercream, as I find it too greasy for my liking. However, I came a cross a recipe for cooked vanilla icing in my 'Baked' recipe book. They wrote that it was not too oily, and that made me want to test it out.

I actually botched it up, but it turned out to be for the better!! You see, in the initial part of the recipe, you have to cook the frosting. I must have left it for too long, and the sugar caramelized! However, I just went ahead with the rest of the method and guess what? The resulting caramel icing was excellent!

I think I might make this botched icing again! :)

Wednesday, September 26, 2012

Elmo for Farees


So this was one of those rare orders which I did for a client whom I did not previously know. (Most of my cakes are for family and friends)

She wanted an Elmo cake, like the one I did previously, but a larger, two tier version.It was for her son's first birthday. First birthdays are always more special don't you think??

The last time I made an Elmo using rice krispies treats, I covered him with red royal icing. It was a pain to pipe all the red fur using a star tip. Just colouring the royal icing a deep red was already a headache. So this time I tried a different approach, which I must say turned out very well!

So I moulded Elmo's body, head and arms using rice krispies treats. Then I covered the pieces in red gumpaste and pieced them together using toothpicks and satay sticks. The resulting surface was bumpy, and it replicated fur very well! The eyes and nose were balls of gumpaste stuck on with water and more toothpicks.

It turned out to be quite a sturdy structure and I was very happy indeed!


So both tiers were chocolate cake and were quite heavy in the end. I am also quite happy with the ganaching on this cake. The surfaces were flat and edges sharp.


The no.1 and the ribbon curlicues were made from gumpaste and everything else was fondant. I think I've found the perfect way to make Elmo and don't mind making him again!


Tuesday, September 25, 2012

Teal and tangerine


I love this colour combination; teal and tangerine. It's so refreshing! I was just waiting for a good opportunity to use these colours! When a buddy of mine wanted cupcakes for a friend who had just given birth to a boy, and basically gave me free reign, I was ecstatic! Ask any artist, when a client says, "design; up to you!" it makes our day!


I heart stamps! They are so easy to use, time-saving, yet very effective! These were made with adorable stamps I acquired on one of my trips to Singapore.


I am still learning more about colours. The names of different shades and how to get just the right shade by mixing colours. I hope to work more on this, because I think the right colours and colour combinations make such a great impact! It elevates a design from 'just good' to 'awesomeness'!


Related Posts with Thumbnails